Difference between revisions of "Using MEd"
m |
m (→Result) |
||
| (2 intermediate revisions by 2 users not shown) | |||
| Line 1: | Line 1: | ||
| − | This tutorial provides a beginner's guide to getting started with the [[MEd|Map Editor by Tonywob]]. It covers setting up your GTA installations, how to display parts of the GTA landscape and how to add generic objects. | + | This tutorial provides a beginner's guide to getting started with the [[MEd|Map Editor by Tonywob]]. It covers setting up your GTA installations, how to display parts of the GTA landscape and how to add and edit generic objects. |
==Preparation== | ==Preparation== | ||
You will need the following before you can begin using MEd: | You will need the following before you can begin using MEd: | ||
| − | * A | + | * A functional installation of GTA III, GTA Vice City or GTA San Andreas. |
| − | * A copy of MEd installed on your computer. ([http://www.gtagarage.com/mods/show.php?id=1053 Download from here].) | + | * A copy of MEd installed on your computer. ([http://www.gtagarage.com/mods/show.php?id=1053 Download it from here].) |
| Line 10: | Line 10: | ||
# Click right on the SA-map. | # Click right on the SA-map. | ||
| − | # Click | + | # Click properties. |
# Turn off the read-only flag. | # Turn off the read-only flag. | ||
# Click Apply. | # Click Apply. | ||
==Introduction== | ==Introduction== | ||
| − | ''''' Note: ''''' This is | + | ''''' Note: ''''' This is the updated tutorial to MEd. The original tutorial was written by Eclipse_nl on the 2nd of December, 2005, and updated by skull82 on the 25th of June, 2020. |
| − | |||
| − | |||
| − | |||
| − | |||
| − | |||
==Tutorial== | ==Tutorial== | ||
| − | Map Editor (MEd) is a | + | Map Editor (MEd) is a tool that allows you to make or edit maps for III/VC or SA in a short time.<br /> |
| − | + | This is how you can use this tool to edit your game's maps. | |
===Step 1=== | ===Step 1=== | ||
| − | + | Install MEd. This tool is compatible with Windows 10. When launched, a popup will appear: | |
[[Image:usingmed1.jpg|none|thumb]] | [[Image:usingmed1.jpg|none|thumb]] | ||
| − | *Click on '''Browse''' and select | + | *Click on '''Browse''' and select your GTA directory. |
*Click on '''Next''' to load the files. | *Click on '''Next''' to load the files. | ||
===Step 2=== | ===Step 2=== | ||
| − | + | After the loading is done, you will get a screen with many options. First, load your desired IPL into the editor. For users with lower-end machines, it isn't recommended to load more than two IPLs at the same time, as it may cause performance issues. | |
| − | + | To load an IPL, go to the tab '''''"Visible Files"''''' and select an IPL to load. IPLs or item placements are segments of the map. The files' names tell which city or any other area of the map that segment goes to. For example, if you want to load the northern portion of San Fierro, you can choose the file "SFn.ipl", where "SF" is the city and "n" is where the IPL should be loaded, in this case, this IPL is the northern portion of San Fierro. Same goes to LAe.ipl, where "LA" is the city (note that cities in the game are internally named as their real-life counterparts) and "e" is where the IPL should be loaded, in this case, this IPL is the eastern portion of Los Santos. | |
[[Image:usingmed2.jpg|none|thumb]] | [[Image:usingmed2.jpg|none|thumb]] | ||
| − | + | You can move around after the IPL has finished loading. To move forward, press W, backwards, S, left, A and right, D. To speed up <br /> | |
| − | There's also an option to change your view mode. You can choose between Player view and | + | movement you can use the Shift button. <br/> |
| − | + | There's also an option to change your view mode. You can choose between Player view and top-down.<br /> | |
| − | If you want to zoom in/out, click on the buttons with the magnify glass. You can also do this with | + | You can press the "Reset view" button if you don't see anything. However if nothing seems to be loaded you can reload that IPL. <br /> |
| − | + | If you want to zoom in/out, click on the buttons with the magnify glass. You can also do this with the scroll wheel on your mouse. | |
| − | |||
===Step 3=== | ===Step 3=== | ||
| − | Now we | + | Now that the IPL has loaded we can select another IPL where we can get the object we wanted to add. You can make a new IPL, or you can add them to an existing IPL. In this case we're going to add our new object to an existing IPL. |
| − | Go to the tab '''''"Item Placement"''''' and select | + | Go to the tab '''''"Item Placement"''''' and select an IPL to get your object from. |
[[Image:usingmed3.jpg|none|thumb]] | [[Image:usingmed3.jpg|none|thumb]] | ||
| − | You can see | + | You can see all the objects that are already stored in this IPL. |
| − | To add you own object, click '''''"New"''''' | + | To add you own object, click '''''"New"'''''. |
===Step 4=== | ===Step 4=== | ||
| − | When you | + | When you clicked on "New", you will see the item browser. From here you can select the object that you want to place into your map. |
[[Image:usingmed4.jpg|none|thumb]] | [[Image:usingmed4.jpg|none|thumb]] | ||
| − | You can see a preview on the | + | You can see a preview on the right-hand side of the screen. After you selected your object, Click "OK". |
===Step 5=== | ===Step 5=== | ||
| − | + | In this case we have selected a tree and now it's on the map. You may have also seen that a new window appeared here. | |
[[Image:basicmap5.jpg|none|thumb]] | [[Image:basicmap5.jpg|none|thumb]] | ||
| − | First click on '''''"Center on Object"'''''. Now you can see your object.<br /> | + | First, click on '''''"Center on Object"'''''. Now you can see your object.<br /> |
| − | + | Choose a place where you want to place your object. You can move your object around with your mouse or with the +/- buttons on your number pad.<br /> | |
You can rotate your object with the movement bars.<br /> | You can rotate your object with the movement bars.<br /> | ||
| − | If you | + | If you want to undo your new changes, click the "Undo" button.<br /> |
| − | + | Once you're done, click "Apply".<br /> | |
===Step 6=== | ===Step 6=== | ||
| − | The | + | The next thing to do is to save that IPL. Select your IPL (if the IPL isn't selected) and click "Save File". |
[[Image:basicmap6.jpg|none|thumb]] | [[Image:basicmap6.jpg|none|thumb]] | ||
===Result=== | ===Result=== | ||
| − | Now close MEd and start your GTA. If you did | + | Now close MEd and start your GTA. If you did it right, you will get something that looks like this: |
[[Image:usingmed7.jpg|none|thumb]] | [[Image:usingmed7.jpg|none|thumb]] | ||
| − | + | We hope you liked this tutorial. More tutorials about this tool will appear soon. See you next time! | |
| − | + | Tutorial last updated on 25th of June, 2020. | |
| + | [[Category:Mapping]] | ||
| − | + | {{SA-navi}} | |
Latest revision as of 11:48, 25 June 2020
This tutorial provides a beginner's guide to getting started with the Map Editor by Tonywob. It covers setting up your GTA installations, how to display parts of the GTA landscape and how to add and edit generic objects.
Contents
Preparation
You will need the following before you can begin using MEd:
- A functional installation of GTA III, GTA Vice City or GTA San Andreas.
- A copy of MEd installed on your computer. (Download it from here.)
You also have to turn off the read-only flag on the SA files:
- Click right on the SA-map.
- Click properties.
- Turn off the read-only flag.
- Click Apply.
Introduction
Note: This is the updated tutorial to MEd. The original tutorial was written by Eclipse_nl on the 2nd of December, 2005, and updated by skull82 on the 25th of June, 2020.
Tutorial
Map Editor (MEd) is a tool that allows you to make or edit maps for III/VC or SA in a short time.
This is how you can use this tool to edit your game's maps.
Step 1
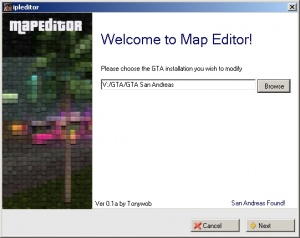
Install MEd. This tool is compatible with Windows 10. When launched, a popup will appear:
- Click on Browse and select your GTA directory.
- Click on Next to load the files.
Step 2
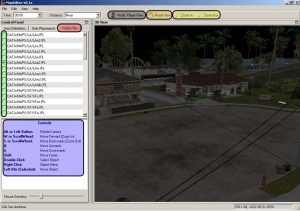
After the loading is done, you will get a screen with many options. First, load your desired IPL into the editor. For users with lower-end machines, it isn't recommended to load more than two IPLs at the same time, as it may cause performance issues.
To load an IPL, go to the tab "Visible Files" and select an IPL to load. IPLs or item placements are segments of the map. The files' names tell which city or any other area of the map that segment goes to. For example, if you want to load the northern portion of San Fierro, you can choose the file "SFn.ipl", where "SF" is the city and "n" is where the IPL should be loaded, in this case, this IPL is the northern portion of San Fierro. Same goes to LAe.ipl, where "LA" is the city (note that cities in the game are internally named as their real-life counterparts) and "e" is where the IPL should be loaded, in this case, this IPL is the eastern portion of Los Santos.
You can move around after the IPL has finished loading. To move forward, press W, backwards, S, left, A and right, D. To speed up
movement you can use the Shift button.
There's also an option to change your view mode. You can choose between Player view and top-down.
You can press the "Reset view" button if you don't see anything. However if nothing seems to be loaded you can reload that IPL.
If you want to zoom in/out, click on the buttons with the magnify glass. You can also do this with the scroll wheel on your mouse.
Step 3
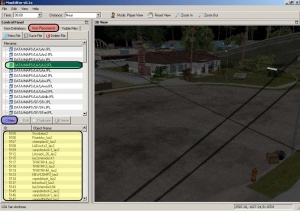
Now that the IPL has loaded we can select another IPL where we can get the object we wanted to add. You can make a new IPL, or you can add them to an existing IPL. In this case we're going to add our new object to an existing IPL.
Go to the tab "Item Placement" and select an IPL to get your object from.
You can see all the objects that are already stored in this IPL.
To add you own object, click "New".
Step 4
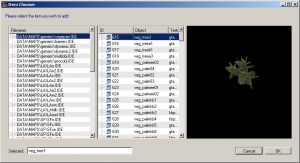
When you clicked on "New", you will see the item browser. From here you can select the object that you want to place into your map.
You can see a preview on the right-hand side of the screen. After you selected your object, Click "OK".
Step 5
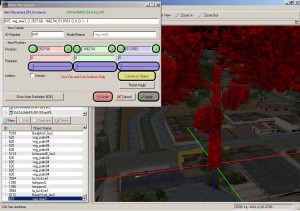
In this case we have selected a tree and now it's on the map. You may have also seen that a new window appeared here.
First, click on "Center on Object". Now you can see your object.
Choose a place where you want to place your object. You can move your object around with your mouse or with the +/- buttons on your number pad.
You can rotate your object with the movement bars.
If you want to undo your new changes, click the "Undo" button.
Once you're done, click "Apply".
Step 6
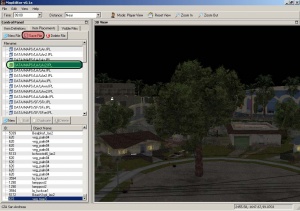
The next thing to do is to save that IPL. Select your IPL (if the IPL isn't selected) and click "Save File".
Result
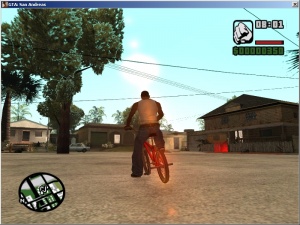
Now close MEd and start your GTA. If you did it right, you will get something that looks like this:
We hope you liked this tutorial. More tutorials about this tool will appear soon. See you next time!
Tutorial last updated on 25th of June, 2020.
